Kappa
“Great things are not done by impulse, but by a series of small things brought together.”
Hack The Box
Networking
Networking is a vital part of any operating system, and we must understand how to manage it ourselves. We have three main ways to manage the macOS host's networking information: the terminal, the System Settings menu, and the Control Center. Let's explore our different options.
Basics
Note: Managing Networking settings along with many other options on a macOS host may require administrative privileges.
Validate Networking Hardware
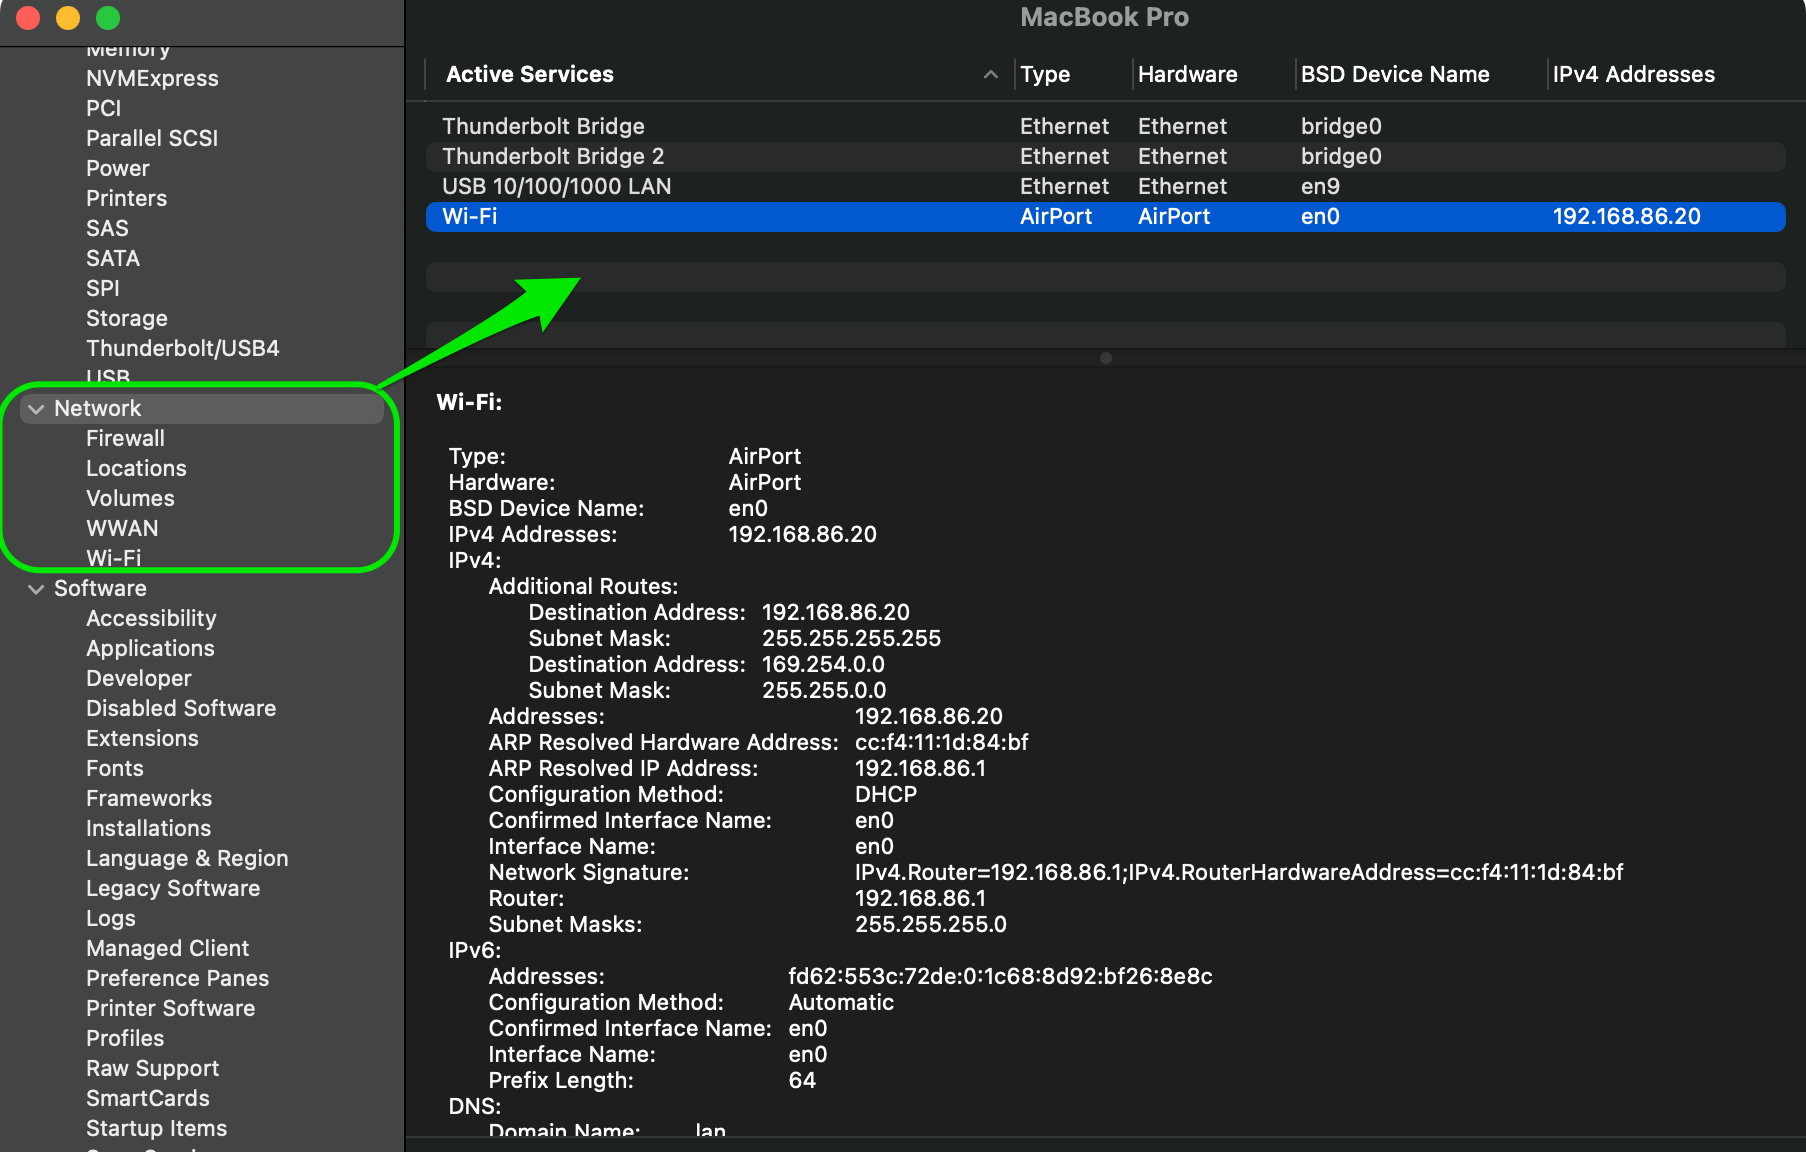
Before managing our settings, we can validate what hardware devices we have available and are active for use in several ways. The first is by checking the Network tab in the System Information application.
System Information
We can get to this screen by searching for "System Information" using Spotlight, or by launching the application from the Launchpad. Here we will see all hardware, software, and OS information. By selecting the Networking tab (highlighted in green above), we can see our active network interfaces, along with their details.
System Settings
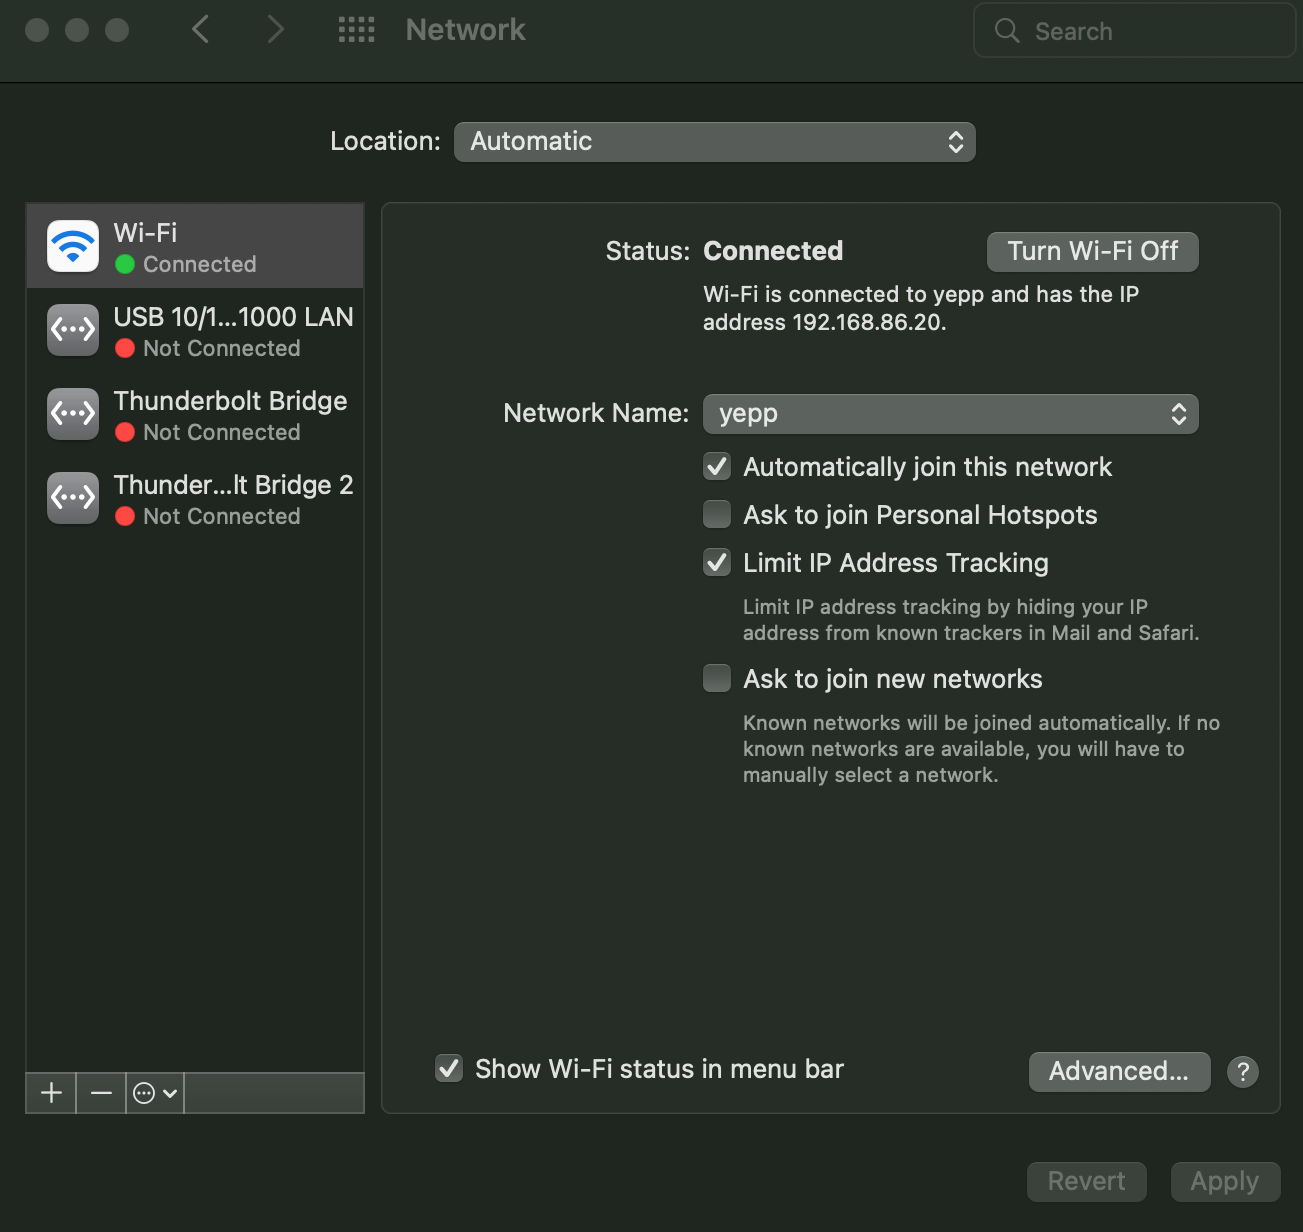
The other route to view network details is through the System Preferences or System Settings, then selecting the Network tab.
Note: On macOS 13, the System Preferences has been renamed to System Settings and also redesigned to match the way it looks on iOS and iPadOS, so you may find some of the references in different locations, but you can always use the settings search function to look for the needed setting. We will try to provide screenshots of both versions for your convenience.
From here, we can view and manage our network devices and their settings and create new networks. To view the interface's configuration details, click the Advanced radial button (green arrow below), and a new pop-up window will appear.
View or Modify Details
The screen will appear and provide you with the interface information you wish to view. If you want to modify the interface, choose the option you wish to set or change. For example, to change our IP, we will need to move the Configure IPv4 to Manually setting instead of "Using DHCP". When done, select Apply or our changes will not persist.
Note: As of now, the recommended way to manage your networking settings for macOS is through the System Settings Network Manager. It is possible to make changes via the CLI, but they may not persist through a reboot as the manager will overwrite the settings you place at boot.
Control Center
The Control Center provides a quick way to manage our networking settings and much more. If we wish to modify one, click on the arrow beside the interface we want to manage, turn it on/off, or select system settings to customize our settings.
Managing Networking Settings Via The CLI
Even though managing interface settings via the CLI is not the preferred method, we can still glean important information from it. Below we are going to take a look at several helpful commands and the outputs they provide.
Finding Info
We have quite a few ways to find information about our network status and settings from the CLI. We are going to start with the easiest first, ifconfig. By typing ifconfig into the terminal, we can see a printout of our network interfaces and their configurations. Below we can see an example of the output we get back.
kappajester83@htb[/htb]$ ifconfig
            lo0: flags=8049"UP,LOOPBACK,RUNNING,MULTICAST" mtu 16384
              options=1203"RXCSUM,TXCSUM,TXSTATUS,SW_TIMESTAMP"
              inet 127.0.0.1 netmask 0xff000000
              inet6 ::1 prefixlen 128
              inet6 fe80::1%lo0 prefixlen 64 scopeid 0x1
              nd6 options=201"PERFORMNUD,DAD"
            en0: flags=8863"UP,BROADCAST,SMART,RUNNING,SIMPLEX,MULTICAST" mtu 1500
              options=6463"RXCSUM,TXCSUM,TSO4,TSO6,CHANNEL_IO,PARTIAL_CSUM,ZEROINVERT_CSUM"
              ether 88:66:5a:11:bb:36
              inet6 fe80::49:92ae:ddf6:7de6%en0 prefixlen 64 secured scopeid 0x6
              inet 192.168.86.20 netmask 0xffffff00 broadcast 192.168.86.255
              inet6 fd71:23d4:486d:0:3:78c:4196:c065 prefixlen 64 autoconf secured
              nd6 options=201"PERFORMNUD,DAD"
              media: autoselect
              status: active
We can see this command pushes out a ton of output. So to clean this up a bit, we can single out an interface we wish to see information about specifically by inputting ifconfig "interface name".
kappajester83@htb[/htb]$ ifconfig en0
            en0: flags=8863'UP,BROADCAST,SMART,RUNNING,SIMPLEX,MULTICAST" mtu 1500
              options=6463"RXCSUM,TXCSUM,TSO4,TSO6,CHANNEL_IO,PARTIAL_CSUM,ZEROINVERT_CSUM"
              ether 88:66:5a:11:bb:36
              inet6 fe80::49:92ae:ddf6:7de6%en0 prefixlen 64 secured scopeid 0x6
              inet 192.168.86.20 netmask 0xffffff00 broadcast 192.168.86.255
              inet6 fd71:23d4:486d:0:3:78c:4196:c065 prefixlen 64 autoconf secured
              nd6 options=201"PERFORMNUD,DAD"
              media: autoselect
              status: active
Looking at our output now, it's much easier to discern what we need instead of sifting through multiple interfaces' worth of output. If we wish to change our interface settings, we can use the ifconfig command.
Setting a Manual IP with ifconfig
            Code: bash
            ifconfig en0 inet "192.168.1.1" netmask "255.255.255.0"
This will set our interface (en0 in the example) to an IP address of 192.168.1.1 with a network mask of 255.255.255.0. To modify it, change the IP to your networking scheme and apply the proper network mask to match.
Note: Changes made with ifconfig are temporary and will be overwritten by the networking service manager after a reboot. For the changes to be persistent, make sure you utilize the NetworkManager in the GUI or through the networksetup command.
Another common task you may find yourself doing is checking the state of ports on your host. We can use lsof to see port states and what files have them bound.
            Code: bash
            lsof -n -i4TCP -P
The string above shows us all applications bound to TCP port/IPv4 addresses, but it does not translate the port number to a common name (ex. SSH == 22). If you wish to see the protocol name, you may remove the -P.
This is a handy command to keep in your toolbox since it makes it super easy to determine what user/context something is running in and show us what is communicating to/from our host. When researching a potential incident, this can be a great way to get a feel for what's going on.
kappajester83@htb[/htb]$ lsof -n -i4TCP -P
            COMMAND    PID USER   FD   TYPE             DEVICE SIZE/OFF NODE NAME
            launchd      1 root    9u  IPv4 0xdc227b7f84d4795f      0t0  TCP 127.0.0.1:22 (LISTEN)
            launchd      1 root   33u  IPv4 0xdc227b7f84d4795f      0t0  TCP 127.0.0.1:8021 (LISTEN)
            launchd      1 root   36u  IPv4 0xdc227b7f84d4795f      0t0  TCP 127.0.0.1:8021 (LISTEN)
            apsd       114 root    9u  IPv4 0xdc227b7f83e27407      0t0  TCP 10.0.7.66:52376->17.57.146.23:5223 (ESTABLISHED)
            VMware     446 User   51u  IPv4 0xdc227b7f83e1feb7      0t0  TCP 192.168.86.52:49226->1.2.3.4:443 (ESTABLISHED)
            ControlCe  451 User   17u  IPv4 0xdc227b7f8416f95f      0t0  TCP *:7000 (LISTEN)
            ControlCe  451 User   19u  IPv4 0xdc227b7f84170407      0t0  TCP *:5000 (LISTEN)
            Google     513 User   23u  IPv4 0xdc227b7f83dffeb7      0t0  TCP 192.168.86.52:52749->192.168.86.31:32251 (ESTABLISHED)
            Google     513 User   27u  IPv4 0xdc227b7f83e25eb7      0t0  TCP 192.168.86.52:49216->192.168.86.24:8009 (ESTABLISHED)
            Slack\x20  731 User   20u  IPv4 0xdc227b7f83562eb7      0t0  TCP 10.0.7.66:52869->54.147.59.169:443 (ESTABLISHED)
            VMware    1613 User   54u  IPv4 0xdc227b7f83572eb7      0t0  TCP 127.0.0.1:51095->127.0.0.1:8698 (ESTABLISHED)
            vmrest    1625 User   45u  IPv4 0xdc227b7f83df5407      0t0  TCP 127.0.0.1:8698 (LISTEN)
This is a quick and easy way to diagnose issues from the CLI. In a later section, Security Tips, we will talk about a tool called Netiquette that can help give us a detailed look into our network connections and what is happening.
Networksetup
Along with the basic networking commands found on most Unix/Linux distros, like ifconfig, macOS also comes with an application called networksetup, which allows us to check and configure our host's networking preferences. Keep in mind that it will require administrative privileges to change networking preferences on the host.
- networksetup -listallnetworkservices - Displays a list of all the network services (device) on the computer’s hardware. This will print out the logical name of the device. (ex. Wi-Fi)
- networksetup -listnetworkserviceorder - This will print out the network services running and the order in which they are queried for connection. A service at the beginning of the list is checked first.
- networksetup -getinfo "devicename" - Get basic info about a networkservice (device) such as the IP address assigned, subnet mask, gateway, and Mac-Address.
- networksetup -getcurrentlocation - Prints out the currently set network location.
- networksetup -setmanual "networkservice" "ip" "netmask" "Gateway" - This will manually configure the ip address, network mask, and gateway for the device specified.
Here're a few basic examples of using networksetup:
kappajester83@htb[/htb]$ hostname
ACADEMY-MAC-2.local
kappajester83@htb[/htb]$ networksetup -listallnetworkservices
An asterisk (*) denotes that a network service is disabled.
USB 10/100/1000 LAN
Wi-Fi
Thunderbolt Bridge
Thunderbolt Bridge 2
kappajester83@htb[/htb]$ networksetup -listnetworkserviceorder
An asterisk (*) denotes that a network service is disabled.
(1) USB 10/100/1000 LAN
(Hardware Port: USB 10/100/1000 LAN, Device: en9)
(2) Wi-Fi
(Hardware Port: Wi-Fi, Device: en0)
(3) Thunderbolt Bridge
(Hardware Port: Thunderbolt Bridge, Device: bridge0)
(4) Thunderbolt Bridge 2
(Hardware Port: Thunderbolt Bridge, Device: bridge0)
kappajester83@htb[/htb]$ networksetup -getinfo Wi-Fi
DHCP Configuration
IP address: 192.168.1.100
Subnet mask: 255.255.255.0
Router: 192.168.1.1
Client ID:
IPv6: Automatic
IPv6 IP address: none
IPv6 Router: none
Wi-Fi ID: 88:66:5a:aa:bb:cc
The above commands are not an exhaustive list of the tool's use. Use networksetup -help for a more detailed listing of the possible actions that can be taken with the networksetup command.
Tips & Tricks
There are a couple of handy macOS networking tricks we can utilize, which we often find useful.
NetworkQuality
The first is the ability to check your interface's network quality using the networkQuality command. We can input this into our shell to see live feedback about our network:
kappajester83@htb[/htb]$ networkQuality -I "interface"
Downlink: capacity 104.874 Mbps, responsiveness 66 RPM - Uplink: capacity 100.708 Mbps, responsiveness 66 RPM
Find Wi-Fi Password
Our next tip is a quick way to find the Password for an SSID you have previously connected to. We will do this using the security command. Security allows us to list and manage our passwords, keychains, certificates, and more via the CLI. The command below will print our requested password:
kappajester83@htb[/htb]$ security find-generic-password -wa Office-2.4G
Sup3r$ecure
Furthermore, in macOS 13 Ventura, we can read the Wi-Fi passwords for any network from the Wi-Fi tab in System Settings
VPNs
Now, let's talk about VPNs for a moment. Every aspiring IT admin and Cybersecurity technician needs reliable VPN software to connect to their office networks, especially those of us using Hack The Box to train and skill up.
A VPN allows us to remotely tunnel our traffic through a network to egress at another point in the world. This is great for masking internet traffic or connecting to corporate environments. We are going to touch on two great options for use with macOS.
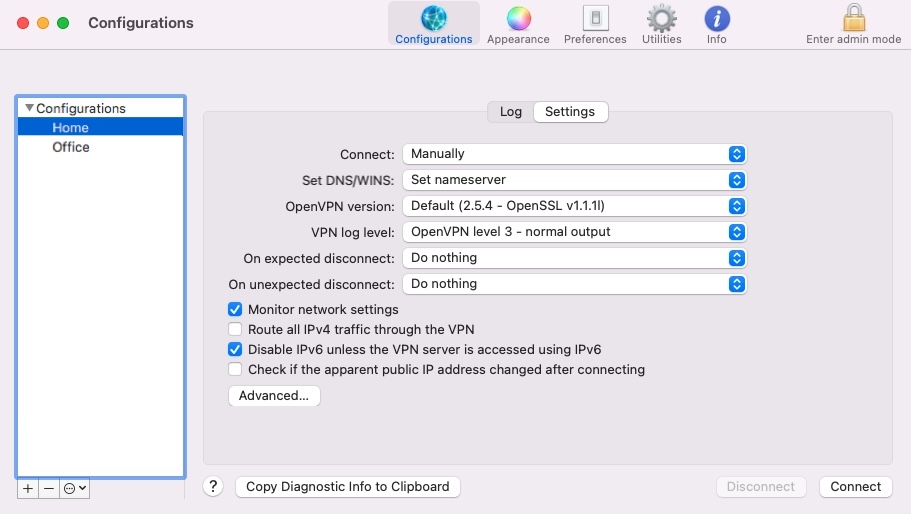
Tunnelblick
The first and most popular option is 'Tunnelblick', our free and open-source option. It is an excellent application for controlling our VPN connections. It works with OpenVPN config files and provides a handy user interface. Tunnelblick keeps our privacy in mind and does not log our traffic, IP address, deliver ads, or anything of that sort which is nice to see from a free product. It also allows persistent VPN connections over device reboots, as it would automatically connect to the last active VPN connection before a reboot.
What makes Tunnelblick unique is that it allows a lot of configurations and customizations to a vast set of variables for our VPN files and connection info. This makes it ideal for non-standard VPN connections, like work networks, where we may be provided a key to connect to a network and perform a penetration test. However, beginners may find it a little bit intimidating at first due to the many available options, but once you get to know the tool, it is relatively easy to use.
Viscosity
Our next option is a paid option Viscosity. It's an excellent choice for a single user, small business, and enterprise use alike. It is intuitive to use and provides live statistics about our network use. For a paid option, what is nice is that Viscosity comes in at $14 USD as a one-time purchase.
There are many other free and paid options, like OpenVPN, which is an official macOS version developed by none other than OpenVPN. Furthermore, various VPN providers that offer VPN services also provide macOS versions of their VPN software. However, these applications would be limited to the VPN services offered by the vendor and do not allow us to install our own VPN configuration (e.g., for work or Hack The Box).
Bonjour
We cannot talk about macOS and networking without quickly mentioning Bonjour. Bonjour is Apple's open-source implementation of zero-configuration networking. It enables the automatic discovery of devices and services on a network using IP protocols, handling addressing, device naming, and service discovery across networks. Devices like printers, TVs, streaming media devices, and even other applications that allow for media sharing and other everyday actions now use this standard in some form.
From an admin perspective, this is great since it will enable us to skip a ton of manual configuration needed to set up devices like printers in a corporate environment. But from a security perspective, this could cause issues.
In macOS, our hosts utilize a protocol called mDNSResponder to perform the service discovery actions to use Bonjour and its suite of services. Through it, our hosts can automatically discover and potentially access other macOS hosts and devices running the protocol suite. This means that any host on our network capable of utilizing mDNS or Bonjour can access hosts or other services they may not have been granted access to. With this in mind, it's a good idea to ensure you are utilizing some form of network/device security along with network segmentation and authentication mechanisms within your environment.
Now that we know how networking works with our host let's move on to application and update management.